Showing posts with label Device Research. Show all posts

Wednesday, 13 April 2022

[Air]Tag You're It!

 This is the accompanying blogpost to the Magnet User Summit 2022 talk: [Air]Tag You're It!


Bluetooth Low Energy and You

First, a primer on Bluetooth based tracking. Bluetooth Low Energy (BLE) is often used with bluetooth beacons in order to transmit location from a beacon back to a smartphone. These devices are often just a 1 way transfer, sending data back to smartphones, not reading data from them. Typically, these beacons are used by specific applications, so only that given application can track the user. These beacons can serve multiple functions, such as alerting you that you're near an Apple Store so you can make an appointment. Others might be used in museums to give you more information about an exhibit as you approach it. There are different types of BLE beacons, including Apple's own "iBeacon" used in retail stores and other locations worldwide. For more info on BLE, please refer to  this article. 

While beacons can have a number of varied purposes, one of their most common is that they're used as trackers for lost items. Similar to other devices such as the Tile, Chipolo, or TrackR devices, these beacons can help you locate lost items such as keys. iBeacons work by broadcasting a UUID (universally unique identifier) that can only be understood by using an online source to translate this back to a separate identifier. Apple uses this system to help maintain user privacy. 


Capitalizing on this function of BLE, Apple released the AirTag devices April of 2021. These devices are similar to other BLE tracker devices, however, feature several more unique features. Most device trackers like Tile, for example, require a device to have the Tile application in order to broadcast back to these devices and alert the user where they are located. Apple's AirTags instead utilize the FindMy service and BLE so that they can communicate to virtually any smartphone in the world without the need of an application. This gives Apple a much wider mesh network for those that use the AirTags worldwide. 

AirTags also utilize Apple's U1 chip to perform ultra-wideband broadcasts. These are high speed broadcasts that are designed to send a lot of data very quickly. The UWB (ultra-wideband) technology isn't extremely new, but has been used by Apple in mobile devices and AirTags since 2019. The UWB technology is used for precise item location for the AirTags which allow you to see which direction your AirTag is from you and how far away the device is. 


 Apple's AirTags use the FindMy service so that any devices that come within range of an AirTag will broadcast back to Apple where that beacon was seen. While this is great from a usability perspective, what happens when someone uses one of these for a more nefarious purpose? What if a user slips an AirTag (normally $29USD) into someone else's property and uses it to track them? This principle isn't new, and I have personally worked multiple cases where bluetooth tracking devices were used to stalk an individual. With Apple having a much larger network of devices than some of its other tracker counterparts and the user not needing an application to report locations, how is Apple keeping people safe from this unauthorized tracking? 

The short answer, is that they're trying, but not doing the best job in the world. But more on that in a minute. 


First, let's explore AirTags from a physical perspective. The devices are roughly the same size in diameter as a lid from my favorite drink of choice, Diet Coke. They feature a metal cover embossed with the Apple logo on one side and white plastic on the other. Underneath the metal cover is a CR2032 battery which powers the device which Apple states should have "more than a year" of life. Under the battery there is also some identifying information of the AirTag including the device's Serial Number. This is where the teardown ends unless you choose to get destructive. Below the cover, though, is a layered donut-shaped board. 

Two sides of the AirTag board and its multi-purposes antenna.

(Image credit ifixit.com

The chips include Apple's U1 ultra-wideband chip, a Nordic Semiconductor BLE/NFC Controller, and a NOR storage chip boasting a whopping 32Mb of storage space.


Pairing and Using AirTags


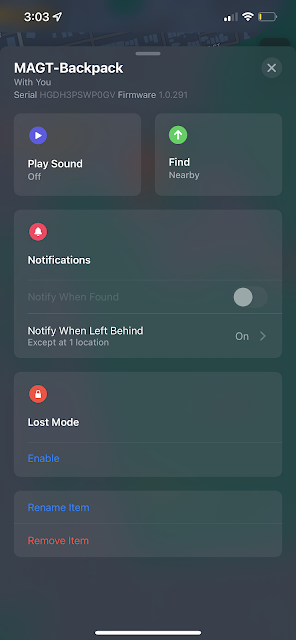
To use AirTags, Apple requires the user to have an Apple ID. The Apple ID is used so Apple can take the broadcasted information and report it back to a specific user. Once the small plastic tab is removed from the AirTag, which separates the battery and its connectors, all users have to do is bring it near their iOS device. Once there, a prompt will allow the user to start the connection and pairing process. Users can also set a custom emoji and name in addition to a set of pre-created names to help identify their devices. Setting the device's type is important because it can allow Siri to locate your device, especially if you're like me, and ask her to "Find my Keys" about 5 times a day. 
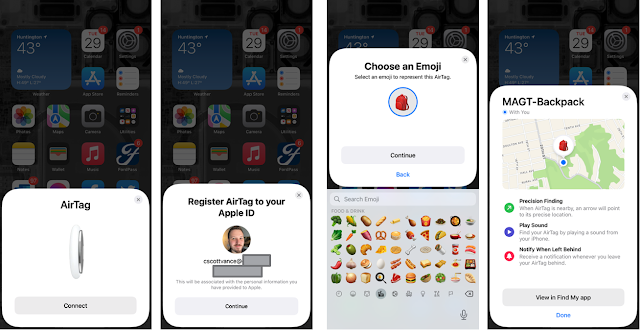


During the pairing process, information, including a key pair, is exchanged with the AirTag and stored on the iOS device; it gets shared via CloudKit to other devices on the Apple ID, including shared family members. You cannot "share" an AirTag, but the identifiers do get shared automatically with other family share members. Several services track the use of AirTags within Apple's Unified Logs, including: 


  • locationd
  • FindMy
  • searchpartyd

The process "searchpartyd" seems to be the most commonly used when discussing information found within the Unified Logs for AirTag devices. Once the device is paired, data such as the serial number, the provided UUID, key storage location, pairing date, and custom name can be found in the logs. 


Note that the word "durian" gets used in the above screenshots. This is because durian is the device codename given to AirTags. Using that value will help you identify records relating to AirTags in the Unified Logs; however, Apple highly privatizes this information. To actually see the UUID values listed above in a sysdiagnose capture, users must first install the AirTag mobile configuration profile. The following example is from a capture of the logs using a sysdiagnose capture method without the profile being installed: 


The data including the UUID of what devices were seen are redacted by Apple with the <private> tag. Without the isWild and UUID, users won't be able to see if these are owned devices.

Playing Sounds and Locating Devices: 



When the user presses the "Play Sound" function as seen above, it triggers several events in the unified logs showing which device (by UUID) that the sound is being played on and if it has been connected. 


When the user tries to locate the device, because of the UWB connection, a large number of logs will be generated while the proximity location is being triggered. 


The UUID of the device being searched in the file system shows that the path /private/var/mobile/Library/com.apple.icloud.searchpartyd/ will store the key pair values and records for the detected broadcasting devices. Within the OwnedBeacons folder here, there are several UUIDs listed for the AirTags as well as other devices including iOS and macOS devices. 

Unfortunately, the UUIDs of the suspect or unauthorized AirTags won't always be here. While some "wild" device observations do get stored, there is a bigger problem here for forensics and tracking when a device was first seen. 

"Protecting" Users with Randomization


As seen above, when an owned AirTag is broadcasting with a device either owned by that same user or one in their family share plan, it will use the UUID value. This value seems to stay static in these situations. However, if the AirTag is not already trusted with that device, the broadcast UUID is actually randomized. While this would be okay if it at least remained static, the UUID actually randomizes and changes multiple times each day. I saw an AirTag change its broadcast UUID to unauthorized devices numerous times each day in my testing. 


While that is happening in the internal logs of the device, what is happening that the user can see? Once an unauthorized AirTag (or compatible FindMy accessory) has been seen traveling with the iOS/macOS device owner for a period of time, a graphical alert will display on that device. As of iOS 15.4, Apple changed this icon from the standard FindMy alert icon to a unique icon showing the difference between a device that has been left behind and an unauthorized device. 



Once the alert is clicked on (which is classified as a "Time Sensitive" notification and MAY override certain Focus settings), it will open the FindMy app so that the user can see information including where the device has been seen with them as well as when it was "first" seen. This information, however, may not be completely accurate. 


From my testing, the window of time is a big concern. Apple states in their limited documentation that the alert will trigger after the device has been seen with a user at a random time between "8 and 24 hours." Later versions of iOS 15 seemed to shorten this window, but Apple has not provided any official documentation on the how, when, or why this happens. From my testing I received a range of time between 1 hour and 8 hours. Apple also seems to trigger these when you reach locations they have deemed as "Significant Locations" but it also may alert at other times as well. The above screenshot is an example of one such test where the device is "first" seen with me at 0500 (even though I had it a long time before that) and it shows me traveling down the road, flying to Atlanta, and finally arriving in the Washington D.C. area. However note that the time on the phone is 1307. This was opened only minutes after I received the notification meaning that Apple took eight hours to alert me this AirTag had been traveling with me! The other issue is that Apple will alert only when the user's trusted devices are not seen near that AirTag so close range tracking may not alert as frequently. 

What happens on the phone though when you trigger one of these "Play Sound" functions on the unauthorized devices? 


Like before, you can see a UUID showing up and that the device is "unauthorized." Unfortunately, this UUID will NOT match what the owner of the AirTag would see (nor would it be stored on the device the same way). 


Once the device has been located, all the user can do is get an NFC broadcast from the AirTag, which will open a page in the default browser. This page from found.apple.com will then display the listed serial number of this device. 


Problems with Randomization
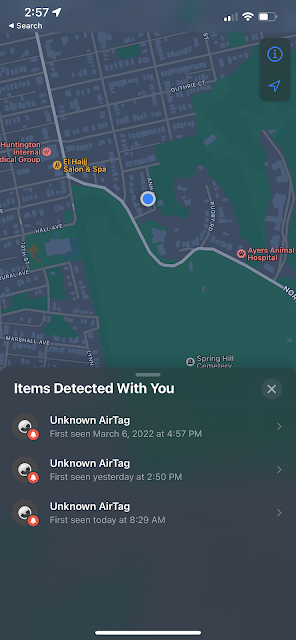

The other problem with Randomization is that currently it seems that iOS/macOS devices don't have a way to reconcile requests once the UUID is rotated. This means that if the user does not press on the notification or views the record to find the AirTag, they might be unable to find it until ANOTHER alert is generated. This is especially problematic as all you can do with a detected unauthorized device is play a sound as precision location finding is not allowed. [Note: Apple has said they are looking to enable louder chimes and precision location finding of unauthorized devices in a later iOS release but as of the writing of this post it was not available.]


The above screenshot shows 3 "Unknown AirTags" but it's actually the same device which has alerted 3 different times because of the UUID rotation. 

How can we identify the owner with no stored artifacts on our victim device, directly tying unauthorized AirTags to the owner, and the UUID being rotated? Unfortunately, we can't do it alone. We'll need Apple's help with that. Because the records are passing back information to Apple's servers, Apple will be able to show who the owner of the AirTag is as long as it's been registered to an AppleID (which it should have been during the setup process for tracking). Apple's own Law Enforcement Guidelines state they can provide AirTag pairing history for up to 25 days with a "subpoena or greater legal process." It is unknown if Apple has a way to show how long an unauthorized device has been detected by a victim's device. Their own guidelines state, "Location services information for a device located through the Find My feature is customer-facing. Apple does not have content of maps or alerts transmitted through the service." They also state that they cannot view the location of any AirTag. 


In a traditional Apple Warrant Return, you will also see the serial number of purchased AirTags under the "APPLE_CONFIDENTIAL.xls" spreadsheet. 

Unfortunately while we can't track the owner or when it was potentially placed, there is a good bit of information we can track if we have the owner of the AirTag's devices. 

Stored AirTag (and Other) Aritfacts


Since AirTags are tracked and viewed through the FindMy application, that's where we'll look. By searching for the UUIDs within the previously mentioned OwnedBeacons folder, several hits (as well as hits for the unique names and serial numbers) were found within a .data file in the path: /private/var/Library/mobile/Caches/com.apple.findmy.fmipcore/. Within this path there are several .data files (which are really just JSON files) called: 
  • FamilyMembers
  • SafeLocations
  • Items
  • Owner
  • ItemGroups
  • Devices

The Owner.data file is fairly self explanatory. It holds the Apple ID of the owner who is signed in to the Find My service on the device. 

The FamilyMembers.data file stores information about other Apple IDs that are tied to the owner via Apple's Family Share features. 

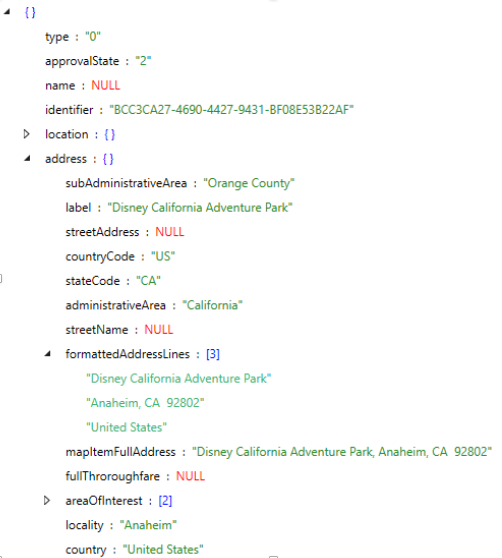
The SafeLocations.data file stores information about what are considered "Safe Locations" for not alerting when FindMy supported devices are left behind. These Safe Locations do NOT have to be locations that the user has ever visited. The locations can be listed in this file as "suggested" locations to the user as well as locations actually set by the user. 


Within the file itself, a "Type" value will reflect a 0 or a 1. A 0 is simply a suggested location that the user MAY have visited, while the 1 is a SET location by the user. 


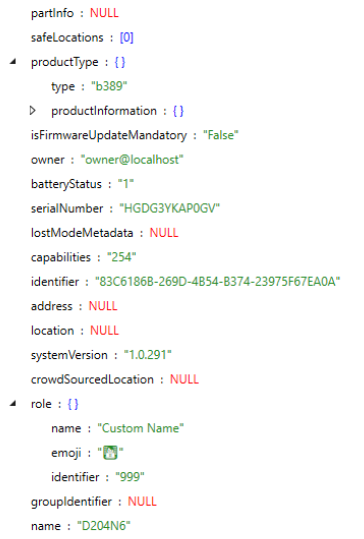
The Items.data file will store the listed AirTag device as well as some other Find My accessories. Third-party accessories may be divided between both the Items.data and Devices.data files. The Items.data JSON file will store for each device: 

  • Names
  • Serial Number
  • Custom Emoji
  • Last Detected Location
  • Last Crowd Sourced Location

The Devices.items file stores similar information to the Items.data file however it tracks other stored iOS and macOS devices that have been tied to the user's Apple ID. While the device's serial number or UDID will not be readily available, other information for both iOS and macOS devices are tracked here including: 
  • Model Numbers
  • Names
  • Address last seen
  • Other status data
Some of this other status data will even track information such as if a wipe attempt is pending or if it is in lost mode. Information about the passcode length may be available in here as well. 

It is also possible to track this information on a macOS device. This information is stored in the same format as above but can be found in the directory ~/Library/Caches/com.apple.findmy.fmipcore/. 


Conclusion: 

AirTags and Apple's use of Bluetooth tracking beacons certainly aren't going anywhere. There have already been many cases where people are trying to use AirTags to stalk or follow someone else and to be honest, Apple still has some work to do to protect users. While the artifacts are great once you have a suspect device, the UUID randomization can be problematic if you only have the victim's device. While Apple does allow for information to show us the paired records between Serial Numbers and Apple IDs, it will require some legal process which is not always an option. 


On the other side, once you have located a rogue AirTag, you can match it via Serial Number within the owner's macOS or iOS device. Other artifacts such as KnowledgeC or PowerLog may also show you when the Find My application was used to view this tracker (although not precisely the rogue tracker, just the service in general). The .data files can be beneficial since they store the name of the device, saved emoji, and the serial number. If the AirTag has been called something specific such as "Lisa's Car" it could potentially help to support your case. 


While the transition to the new notification icon for rogue devices in 15.4 is helpful, I believe Apple still has a way to go to protect people from planted rogue devices. Just playing the sound is not enough, and precision location finding would be helpful, but Apple has still yet to implement that function. This would also require UWB equipped devices such as an iPhone 11 or higher, meaning not all devices will be able to locate it. There's also the Android problem. While Apple has released an application to allow you to sweep for AirTags, it's still a manual process, and just because one is detected doesn't mean it hasn't been with you for a long time. Apple's documentation also needs work on the when, how, and why they choose to alert users that unknown devices are with them. 


As Apple continues to evolve the safety mechanisms of this technology, I know I'll keep my eye on these little AirTags. That being said, I'm a HUGE fan of them myself, and I do appreciate Apple's work to keep others from using my broadcasted UUID to track my movements. Until next time, Tag! You're it!a


Sunday, 23 August 2020

Rooting Samsung devices (2020) with Magisk [RESEARCH]

 Oh Samsung. Truly if any device has ever been the bane of my existence in mobile forensics, it's Samsung devices. From the "latest and greatest" in security advancements, proprietary applications and storage areas, and seemingly zero consistency Samsung has all of the hallmark pieces to cause annoyances to anyone doing forensics. 


According to gs.statcounter.com (link), Samsung is currently sitting at the top of the market share for all mobile devices, even beating out Apple. Since Android is probably the most popular OS for mobile phones worldwide, I can't say I'm surprised. 


It's no wonder with all of these points that I commonly choose a Samsung device to add to my research testing bank of devices. Especially when you consider that Samsung LOVES to push their own proprietary applications instead of the commonly used ones on Android devices. Recently I mentioned adding a Samsung A11 (SM-A115U1) to my test bank in this post here. If it serves no more purpose than a place for me to remember what I did to finally get this working after messing with it for days, I'm going to post the guide of information that I used in order to get this device rooted for full filesystem testing. Hopefully, someone else will find this relevant to their interests eventually too. 


Starting out, I like Magisk. If you're not familiar with Magisk, then go read about it from GitHub here. I think Magisk does a great job of being able to maintain my ability to keep a device rooted, safe(er) than some other options, and gives me more control over my environment. So time to start down the Magisk road. 


In a perfect world, you'll pick a Samsung device where TWRP is already built and available. Save yourself a lot of time and headache and pick a device where TWRP is already available. Do yourself a favor and GTS. (Google that... stuff) I THOUGHT I did that. But, in my excitement for adding another device I saw that the 2019 version of the A11 had a TWRP, but that didn't work on my 2020 version of the A11. 


Okay, so without TWRP, how do you install Magisk? It's a little bit harder but it's actually more to my preferred method. I like to keep things as stock as possible, so I actually usually prefer to go this method and simply take a stock firmware and allow MagiskManger to patch it. It usually works great, except for this one. I'm going to skip over all the stuff that DIDN'T work, and just give you the stuff that does. 


Step 1: 

Find firmware. You're going to need stock firmware from the manufacturer in order to feed it to MagiskManger. Samsung actually doesn't make this impossible. Or well, great developers from across the world make this not impossible. I usually use a site like https://www.sammobile.com but they didn't have the firmware I wanted listed. Then I turned over to some fairly sketchy looking 3rd party sites but it got the job done. Remember that not only are you going to need your model number but you're going to Country Specific Code that Samsung makes integral to their binaries. 

Smarter Move: Just use Feija. I WISH I would have realized this exists and it's now one of my favorite tools. https://forum.xda-developers.com/s10-plus/how-to/tool-frija-samsung-firmware-downloader-t3910594

TL;DR: It's a Samsung firmware downloader where you don't have to pay for "premium" access to get a download that doesn't crash 5000 times just to get a firmware. 


Step 2: 

Set up your Samsung device. Lots of mini-steps going on here but it's all super easy stuff you are probably familiar with. 

  • Proceed through initial setup; Turn on Developer options
  • In Developer options, enable OEM unlock and USB debugging
  • Reboot device in download mode.
    • CAREFUL: There are two? different download modes. One available via "adb reboot download" and another that is available from a specific keystroke command using the physical buttons. The only way I could get into the device wipe/OEM unlock mode was to use the keystroke method. The ADB command would NOT give me the option. For my A11 it was Volume Up + Volume Down + and Power/Bixby buttons all at once. This mode is VERY important to Magisk later. 
  • Unlock Bootloader - WARNING: This causes a device wipe
  • Proceed through initial setup again, enabling developer options and usb debugging. 
  • Install MagiskManager 
    • Download it from the web OR
    • Download it on your PC and use "adb install [Path_to_File_onPC]\MagiskManager.apk"
  • Download Odin: https://samsungodin.com/download/
  • Also, download 7-zip from here: https://github.com/mcmilk/7-Zip-zstd/releases

Okay, now, warning time. This is where I'm going off the rails. Up to this point, you could have really just followed the default directions from Magisk's website. However, 2020 Samsung Devices are doing something different and I can't quite put my finger on it. NORMALLY, you would just push the AP file from your Frija or SamMobile download into MagiskManager do :DoTheThing: but it's not that easy this time around. If you do this, you'll likely get an error returned on the device that says Secure Fail: vbmeta

So what is VBMeta? Well, it's part of AVB or Android Verified Boot. For more info on AVB, go here: https://android.googlesource.com/platform/external/avb/+/oreo-dev/README.md

So let's break down what's actually in the AP image that is getting patched by Magisk. If you expand the zip of the firmware you got you'll see this: 


So let's use that 7zip we got and expand the AP .md5 file. You'll see this: 


Oh great. Lz4... (link) This is one of the reasons I said download the 7zip I mentioned, and not the one you'd just likely already have on your system (because 7z is life). Each of the img.lz4 files are responsible for a different partition on the Samsung phone. I spent a few days pulling these apart the best I could figure out and experimenting with just patching specific image files and trying that. 

Now, Samsung has bee using lz4 since Oreo. So I don't think that's the issue here completely. But it causes another layer of complexity. Magisk will even recommend the ability to just patch a boot image which can be used when you don't already have a custom recovery or your device isn't using an A/B structure. My Samsung is NOT using A/B structure, there's no TWRP available for it, so you know what, why not? Worth a shot right? This is why having the stock firmware is so important. Screw up? Flash it back. 

Step 3: 

Once you've expanded your AP_.md5 file, open the boot.img.lz4 file from within 7zip. Export the boot.img file to your PC. 

Step 4: 

Push the boot.img file to your phone by using the command: adb push boot.img /sdard/
This pushes the boot.img file to your sdcard of your device and puts it in a location where MagiskManger should be able to see it. 

Step 5: 

Using the MagiskManager app, select "Install" and then "Select and patch a file" 
Point MagiskManager to your uploaded boot.img file. After completing, it will create a magisk_patched.img file in your /sdcard/Download (or /media/0/Download depending on how you're seeing your device. 

Pull this file back to your PC using "adb pull /sdcard/Download/magisk_patched.img" 

Step 6: 

Normally if you have a patched boot image you can just send your device into Fastboot and flash the boot volume. But, not with Samsung. 

Take your magisk_patched.img file and rename it to boot.img. Using the same 7zip I mentioned, send this to a .tar file. (Right click --> 7zip --> Add to Archive --> Select tar) You'll end up with boot.tar

Step 7: 

Finally time to invoke the All-Father. 

Send the Samsung device back to the download mode. I used the keystroke command not adb. 

Using Odin, flash the boot.tar file that you have created from the patched boot.img using the AP option in Odin. 

Step 8:

Once the device boots, launch MagiskManager. It should :DoTheThing: and you should have  it come back as successfully installed. 

Just for good measure, I like to throw up an adb terminal and do: 
adb devices
adb shell
su

MagiskManager should prompt to allow you access and then BAM you're G2G. Now you can selectively image your device (or Full File System) to your heart's content. 

One benefit to doing it this way instead of the standard procedure for Samsung is that we're not forced to wipe our devices in between. Another benefit to just patching the boot volume is that you don't to restart it using the recovery mode keystroke every time either. 

Okay! Go forth and plunder the data off those Sammies! Like I said, I hope this goes to help even one person out or maybe even myself the next time I have to deal with Samsung and forget this. 

Wednesday, 19 August 2020

Setting up a "Testing Lab" of iOS and Android devices

 After a student of mine recently "gently" reminded me that I hadn't updated my blog in over a year, I decided that it was time to get back into it! Whoops! So I figured I would ease myself back in with something that I've been thinking about for a while and needed to update on. In this post, I'm going to detail how to pick a couple of iOS and Android devices to build yourself a good testing lab. 

Disclaimer: I'm not building exploits, and I'm not testing them. What I mean by that is that when I build out devices, I take the steps ahead of time to build out devices that I know I can easily gain root/full access to. Why? Because I'm interested in artifacts! The bottom line is that getting the data is always going to be the hardest. I leave that to people a lot smarter than myself to figure out. What I care about is WHEN I can get the data, what can I do with it? 

It's also important to realize that whether you're testing system-level artifacts or third-party applications, you want to grab data in a number of different ways. Sometimes data will be available in a "Quick" image type, sometimes, it's restricted to a full filesystem pull only. Sometimes the data may be available from a cloud source, while other times it's restricted to on-device only. Heck, even sometimes the data is ONLY in the cloud! Because of these factors, you want to choose a set of devices that are going to offer you the most flexibility across the board. 

For my testing lab, I usually like to have a bank of four devices. I know that sounds like a lot if your budget is small, but hopefully this post will illustrate the importance of having them and how you can stretch your budget to go farther. I'm going to break it down into two sections, iOS and Android. 


Take a Byte!

Let's start with everyone's favorite (or least favorite) fruit-named company, Apple. iOS is a huge leader in popularity, at least here in North America. Over the last year, there has been some AMAZING research done around iOS that has extended our capabilities in the research aspect. That being said, the checkm8 research isn't available for all iOS devices out there. If you're going to rely on checkm8 to get full filesystem images, you want to pick a set of iOS devices that's going to allow you to maximize the amount of time you can use it. 


Exploitable iOS Device: 

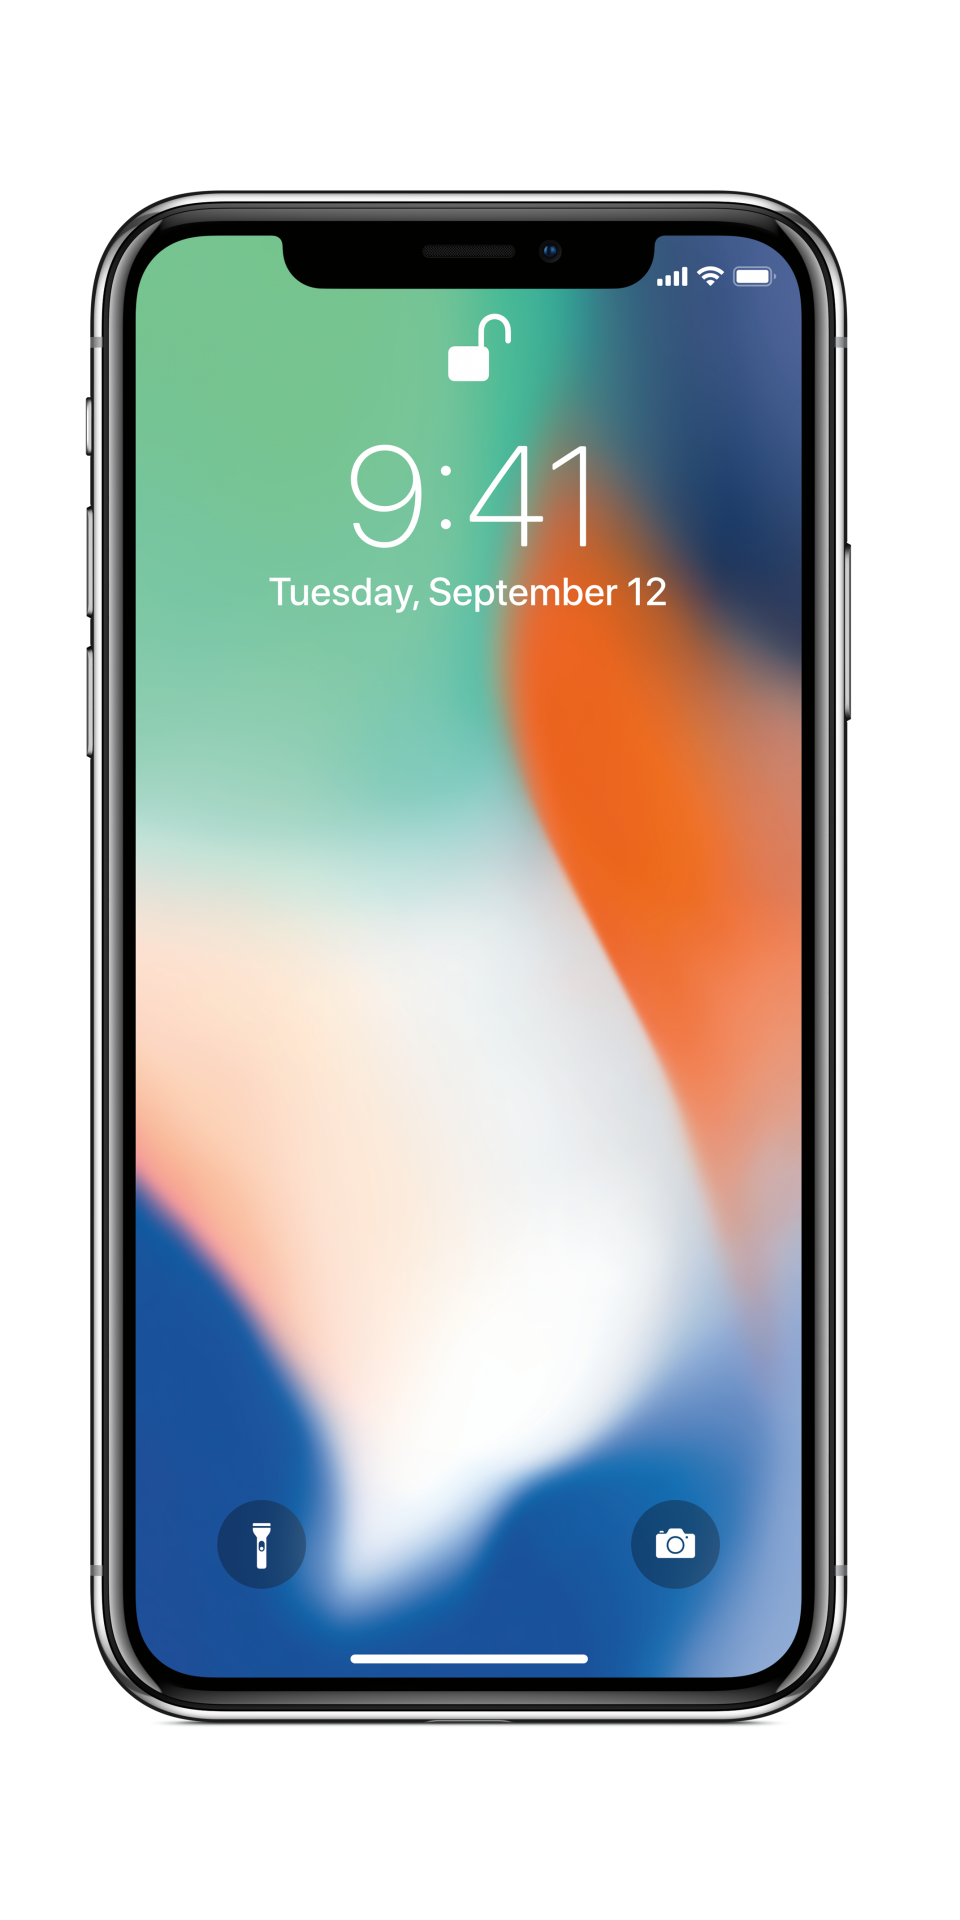
Option 1: iPhone 8/iPhone X

IPhone X PNG Image - PurePNG | Free transparent CC0 PNG Image Library

Running the A11 chipset, these are the latest iPhone devices that are going to be exploitable by the checkm8 exploit. The iPhone 8 and iPhone X came out in 2017 meaning that they're already showing age in Apple years. 

If you choose to buy one of these straight from Apple's refurb website, you can get them for 339 USD or 599 USD for the 8 or X respectively. A little pricey for a test device that's already 3 years old. While I believe these will get support for a while, I'm all about longevity with my test devices because my budget only opens up every so often. Purchasing Apple devices secondhand is often safer than some other devices because these devices can be securely factory reset. With that in mind, make sure the device is not activation locked or that the IMEI is not blacklisted before purchasing. 


Option 2: 

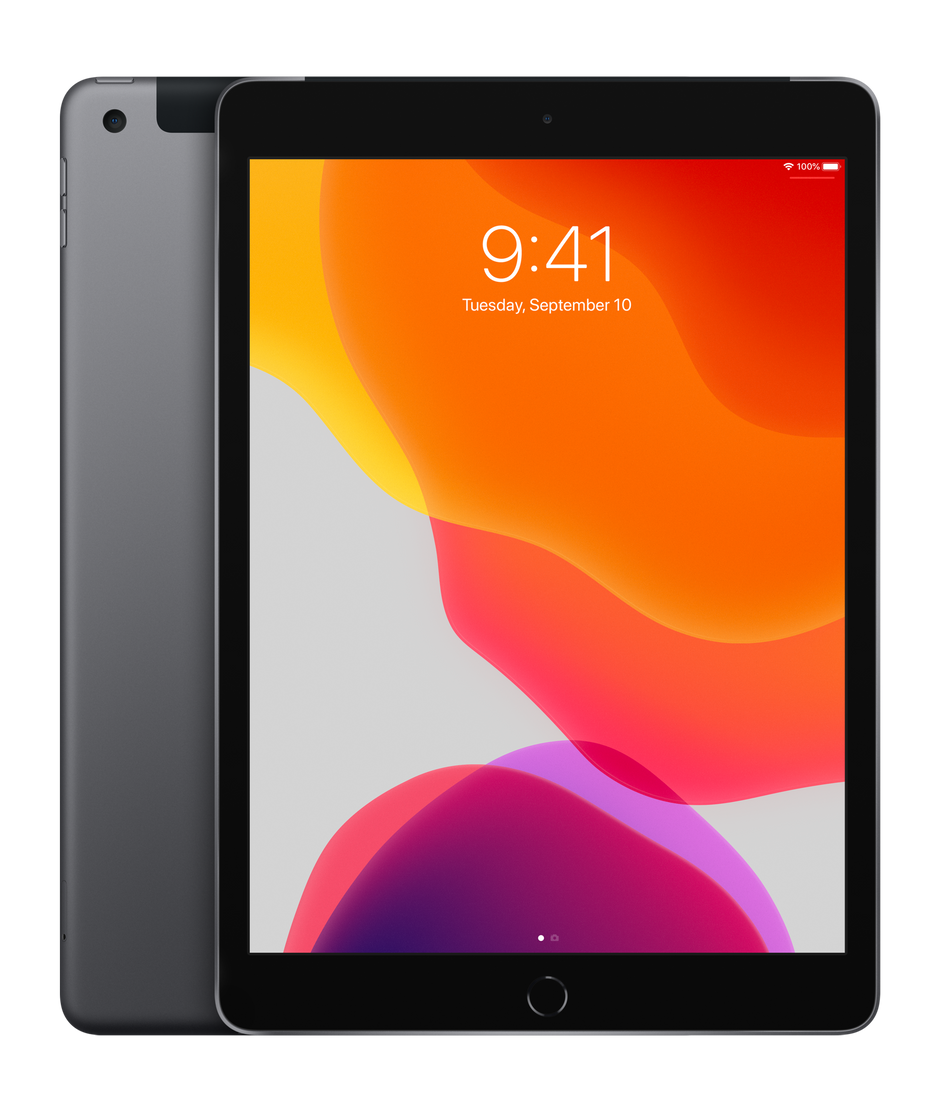
iPad 7th Generation (2019) Model

10.2-inch iPad Wi-Fi 32GB - Space Gray - Apple

For my money, I think if I wanted an iOS device that was vulnerable to the checkm8 exploit for full filesystem testing, I'm going to go with an iPad from 2019. Not the mini, not the Air, and not the Pro. Just the plain old iPad (7th Generation). 

Brand new from Apple today, you can score one of these for 329 USD for Wi-Fi only or 459 USD for Wi-FI + Cellular. Do you really need Cellular? It depends on what you want to test! One reason to get a cellular device is to test specific cell-tower based location data or tracking application data usage over cellular (not just Wi-Fi). 

But why an iPad? Don't you need a phone? Well... again, it goes back to our two favorite (least favorite) words in mobile forensics: IT DEPENDS. Are you just testing app data and how the system generates artifacts? Then an iPad is going to be great. Are you testing specific location data generation? This will do it. Do you need call and sms data? Well, you can get FaceTime and iMessage data which live right alongside standard telephony calls and SMS/MMS messages. And if you have a SECOND iOS device, like one I'll mention soon, it allows you to forward that information to this device so problem solved!

Another reason to have an iPad in your testing arsenal is that iPadOS does have some slight differences between it and iOS for iPhones. While they're mostly cosmetic and involve how the user interacts with apps, there could be some artifacts that differ (I'm looking at you, Safari Downloads :shakes fist:)


Non-Exploitable Devices

Maybe checkm8 isn't required in your testing. Maybe you're operating in an environment where it wouldn't be approved to use, or you are only operating with quick, iTunes-style backups anyway. In this case, I'm going to recommend another device. When building out my most recent test environment, I went with Option 2 above and the next mentioned device. Skip the XS and 11 Pro Max. Go for the SE!


Apple iPhone SE 2nd Generation T-Mobile for $219


This device isn't the sexiest on the market, let's be honest. But that's not what I need it for. I don't need the fidget-spinner style camera strapped to the back. Just one that can take pictures and operating running iOS for the next several years to come. This device packs an A13 chipset just like the iPhone 11 series. 

This budget-minded iPhone came out in 2020 and can be picked up brand new for 399 USD. That's two hundred dollars cheaper than the iPhone X refurbished on Apple's website! That means for the price of said iPhone X, I could instead pick up the iPhone SE (2nd Gen) and a 7th-Gen iPad for only about 120 USD more. That's not even including sales where I could possibly pick up the iPad cheaper (I bought my last one for even less than the going rate). This leaves you with one checkm8 exploitable device and one that runs the latest available processor. What are you missing in the SE? Well, no FaceID. It's still TouchID because it's the budget iPhone. 


Why Two iOS Devices? 

This is a simple one. Apple loves to sync! It's incredibly common for a user once in the Apple ecosystem to drink deep of the Apple-flavored KoolAid and have both an iPhone and an iPad. There are also a lot of artifacts (looking at you again Safari) that are generated when a user has more than one iOS device that can be crucial in investigations! Also if you have both, you can have one device running cellular service and generating call/SMS data, use a hotspot feature for the iPad, and constantly have it syncing the data across! It's a win-win system!

Another reason for a second device? Testing the transmission of data form one to another! Think about Wi-Fi password sharing, Airdrop transmissions, and PIN sharing!


Andy's Turn

Okay, I'm done waxing poetic on Apple for a while (if you know me, you know that's a lie). It's time to talk about the popular green guy in the room, Andy the Android. The Android operating system is one of the most widely distributed OS platforms worldwide and backed by several giants in their own right. For me personally, I'm going to skip a tablet this time around and go with not one, but two different budget-minded Android devices. 


The Venerated Veteran

The only Android devices I've ever "liked" (read: tolerated) are the ones that come straight from Google. I'm talking about the Nexus and Pixel lines of devices. The reasons why could fill a blog post in its own right, but I'll be brief. 

  • STOCK Android (No bloatware)
  • Runs on just about any carrier
  • Longer update life than most Androids
  • Easily fixable 
Breaking that down just a bit, first, the stock part. The Nexus/Pixel line of devices don't have all the carrier's and manufacturer's hands in them like many other Android devices. They're kept "pure" and allowed to run an un-skinned version of Android. This is good and bad. We can see the CORE of android, but may miss out on some ofthe flavor added by other vendors that can generate some unique artifacts. 
Many of these devices are unlocked, meaning no matter where you are you can just slap a SIM in it and go. Google also offers a very affordable Google Fi plan (that also works on iOS) that can be activated and de-activated as needed so that helps when doing data gen. 
The Pixel and Nexus line gets updates first, and keeps them going longer than most Android devices on the market. Because they're so easily unlockable, users will often keep the support running for these devices even after Google has pulled the plug too. 
Finally, they're easily fixable. I'm often known as "The Breaker of Things" depending on who you ask. I break things. A lot. The nice thing about the Pixel line of devices is that the stock ROMs are easily available on Google's website so if I screw something up I can always reset to zero and try again. 

My pick for this category is going to be another budget-minded device, the Pixel 4a. Now, I'm currently rocking a Pixel 3a in my test arsenal, but the principles are the same. The Pixel 4a is available today (just came out) for around 350USD. [Actually, as of writing this post, it doesn't even ship until 20 Aug 2020]

So whether you're going Pixel 3a or 4a, this is my first choice for Android. At the end of this post, I'll be talking about some software-level setup you need to do. DON'T SKIP THIS STUFF! If you do it right the first time, you're going to save yourself a lot of grief in the future. Without properly setting up your device, you may have to wipe it before you can even get the data you want! 


What About Sammy? 
product-main-image

If you're going to expand your Android testing set to include a vendor specific device type, make it a Samsung. Samsung is likely one of the most popular device types out there depending on where you are in the world. Huawei would be a close second, but Samsung is big in my market areas so I pick that one. 

Now, I've often said I'll never own a Samsung phone. This is true as a daily driver, however, there's a lot of good reasons to own one for testing. Samsung is one of the worst at using their own proprietary applications. They use their own browser, their own messaging app, their own file tracker apps, and much, much more. They also have their own backup service type in SmartSync and their own separate Cloud storage service outside of traditional Google storage. Heck, they even have the "Galaxy Store" versus the traditional Google Play store. 

Samsung phones are a lot like Apple ones. They're overpriced and hold their "value" for a long time. As per usual, I'm going to recommend a budget device here. I just picked up a Samsung A11 (SM-A115U1) for about 179 USD. Since it's unlocked, it's one of the US based devices with an easy to unlock boot loader. 


A thought about emulators: 
I know a lot of people like to use emulators. Me personally? I've had a less than desirable experience with them. If you can't afford an Android device or you're just wanting to test an application, there's a lot of decent emulator services out there. If you are going to go the emulator route, also understand that not all emulators are created equally. Make sure you find an emulator that is going to give you configurable root access, and can mimic multiple OS versions, and even device types to get access to applications that are locked to a specific vendor. Also, pretty simple, but make sure you can get adb access to the emulator from your test environment. Amazing how many times I've started down that road without checking that first. 

I also like the free tool from Magnet, the Android App Simulator. It's a free tool that uses Virtualbox to create a snapshotted Android image that you can inject files into. If you're just looking for a quick test bed environment, this is the one I'd recommend. You can find out more info about that tool here

Let's talk Setup!
Now that we've identified our 4 test devices (iPhone SE, iPad (2019 7th Generation), Pixel 3a/4a, and Samsung A11) we need to establish some setup steps. If you skip the setup phase on some of this stuff, you're gonna have a bad time. Do it right the first time, and you won't have to potentially re-do all your data gen. 

iOS Setup: 
Identify which route you're going to take. Are you going to Jailbreak? Are you going to use checkm8? Are you going to rely on iTunes only? Are you interested in Cloud? Lots of questions to answer. If you're sticking to the guide I've been laying out, then you're likely going with the the iPad and SE model. For that, you're not going to need much to set up. 

If you're on a macOS device and you need to do setup, I'm going to point you to @BizzyBarney's post that he did on @iamevltwin's mac4n6 blog here

If you're on a Window's device, you're going to need a few pieces of software. Unfortunately, you're going to need a forensic tool or a macOS device to do checkm8 until we get a Windows port. 
  • iTunes: A must-have as Apple really doesn't like to share the iOS driver outside of this. 
  • LibiMobileDevice
Personally, I make my life a lot easier, and I just use Magnet's AXIOM or Acquire. [Disclaimer: I work for Magnet if you didn't know] These tools support making Quick images, getting the MTP available data, and even getting full filesystem images if you go the checkra1n route. If you are going with checkra1n and jailbreaking the iPad, you can also just use SSH to interface with the device. 

iCloud Setup: 
If you're going to do iCloud testing as well, a couple of things to consider. All newly created AppleID accounts are forced into using 2FA for the accounts using Apple's trusted device platform. Once you enable 2FA, you can't downgrade it. Technically, you can access the 2FA codes even from an offline iOS device so even if you don't keep your test devices online long term, you should be okay. If you don't want to use 2FA, there is a pretty sneaky workaround I've found. 

  1. Create a minor account and tie it to your own AppleID via family sharing. 
  2. Make this "minor" 17 years old and about a week away from their birthday. 
  3. Once the account owner "turns" 18, you can remove them from your family share plan. Now you have a fully functional plan without 2FA; just don't enable it. 

Only minor account are allowed to set up without 2FA. This is a great little workaround (until Apple shuts it down that is). 

Software you need: 
The Android SDK platform-tools. You're going to need adb and fastboot at a minimum. These are the backbone and workhorses of dealing with Android. In fact, it's basically all I use for device setups and imaging outside of using Magnet Acquire/AXIOM. 

These setup instructions are more important than anything else you do. Some of the steps we take here MUST be done at the very beginning. For most devices these instructions are going to be the same, but I'm going to detail a few points on both our Pixel and the Samsung A11 because there are some subtle differences. 

Step One: Pick a device that we can unlock the bootloader on. Go ahead and skip all the normal setup steps and get straight into the device. Enable Developer Mode, and tick on the OEM unlock option as well as USB Debugging. 

On the Pixel, we'll need to reboot this device into Fastboot mode and running some commands. You can follow this guide from xda-developers here even if you're using a newer Pixel device. 

For the Samsung, the process is almost the same, but it requires some button commands instead of command line interaction. You can follow these instructions, however, a thing that I spent hours dealing with: 
Once you're ready to get into download mode and unlock the boot loader, no key command I found find online worked. Here's what I did with my A11 - 
  • Make sure phone is above 80% power. I could NOT get this to work until it was on at least 80% power. 
  • Power Off phone 
  • Hold Volume Up + Volume Down + Power while plugging in the USB-C cable (use the one that came with the phone, not all USB-C cables are created equal)
  • Hold the Volume Up button and allow it to reset/wipe the device. 

Step Two: Now that the device is wiped and the boot loader unlocked, we can then go and do the standard setup of creating a Google account (and/or Samsung account). Turn back on USB Debugging at this phase. 

Step Three: Find the stock ROM for your device. For Pixel devices, this is easy. Google hosts all your stock firmware files here: https://developers.google.com/android/images

For Samsung, devices, it's a LITTLE harder. I recommend a good GTS (Google That... Stuff) and looking for the files online like at sammobile. 

On the A/B boot style devices of Android (like Pixels) you'll have to modify and need the stock boot partition. For Samsung devices, you'll need a stock recovery partition. 

Step Four: Follow the instructions to modify your stock boot/recovery file using Magisk here

Now that your device is rooted with Magisk, you can selective acquire full file system images or get quick images. Again, I like to use Magnet AXIOM or Acquire for this just to make my life easier. 

There we have it! Four devices and instructions to get you up and running! Depending upon your needs you now should have the tools at your disposal to get out there and get researching!